IKEA Hack: Upgrade the TARVA Dresser into a Dapper Showpiece


I work with many clients who have wildly varying budgets. Some clients seem to have an endless well of funds while others need to adhere to a tighter budget. But I’ve always believed that creating a beautiful space can be accessible for almost any financial situation.
A Tale of Two Dressers
My clients, Brian and Kathy, had a couple pieces of outdated furniture in their bedroom including an armoire and dresser. They asked me to redesign the space to fit their vision of a modern farmhouse retreat. I loved the fact that their old furniture was made out of solid wood, so we all felt a little sad about giving it away. But alas, sometimes you have to let go of something to make room for a new chapter in your life.

Kathy really wanted something substantial enough to fit the clothes that once occupied the the large armoire and dresser we removed. We needed something both tall and wide with deep drawers. This proved quite difficult especially given the budget constraints. I definitely didn’t want to replace their old solid wood furniture with something made of particle board, but large solid wood dressers typically run around $2000 or more.

I scoured the internet to find a dresser that would suit their needs, but everything that fit the bill ended up costing way more than the budget would allow. However, pressure often precedes creative solutions, so I came up with an IKEA hack that drew inspiration from a West Elm dresser I found.

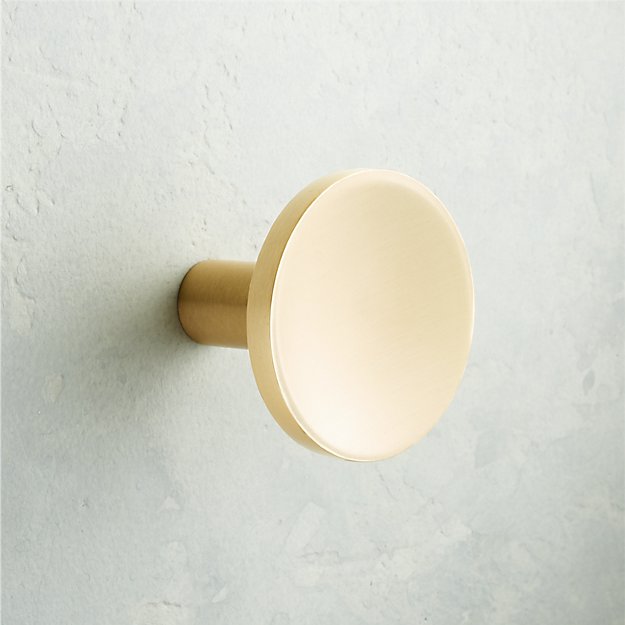
My solution: Purchase two IKEA Tarva solid pine dressers. Replace the knobs with brass ones from CB2. Paint the dressers with Behr Midnight in the Tropics. Both Kathy and Brian immediately loved the idea.
Cost Breakdown:
- IKEA Tarva dresser (x2) $150 ea.
- CB2 brass knobs (x20) $5 ea.
- Paint: “Behr Midnight in the Tropics” Satin Finish (2 quarts) $17 ea.
- Total: $434
Other Tools You’ll Need:
- Paint roller
- Paint brush
- Paint tray
- Sand paper 200 grit
- Drop Cloth
STEP 1: Assemble
Like with all IKEA furniture, you have to assemble everything yourself. These dressers come in a bajillion pieces so be sure to set aside enough time to put them together.
STEP 2: Sand down rough spots and prime
The Tarva is already pretty smooth, so sanding may not be necessary. Priming is only necessary if you don’t have a paint with a built-in primer.
STEP 3. Paint the first coat
I recommend using a small roller brush for the larger surfaces and a paintbrush for hard to reach places. Generally I like to start painting the hard to reach places first with the paint brush and then use the roller on the larger surfaces to smooth everything out.
Kathy and Brian painted the dresser while assembled, but it is probably easier to remove the drawers to paint them separately.

STEP 4: Sand
Painting wood – especially a soft wood like pine – will cause the grain to rise. After the first coat dries, use a fine grit sand paper to smooth down the rough spots. Use a tack cloth or a damp towel to wipe off all the dust.
STEP 5: Paint the second coat

STEP 6: Install the knobs.
Luckily the holes for the knobs are predrilled in the Tarva dresser. So all you need to do is screw the knobs in.
STEP 7: Call your designer and show off your work
When Kathy and Brian first revealed the dressers to me via FaceTime, I couldn’t believe how great they turned out. The dressers looked incredibly dapper and expensive. I felt so proud of them.
My hope for this blog is to inspire and empower people to take control of the spaces they occupy. No matter what your financial situation may be, you can always find creative solutions to make a space that lifts your spirit. Seeing Brian and Kathy build and create together brought me a lot of joy and I hope that joy is contagious. Happy hacking!


You May Also Like…

8 Replies to “IKEA Hack: Upgrade the TARVA Dresser into a Dapper Showpiece”
This is amazing.
Hi – i love this project and am recreating something similar at home! I am using Behr Marquee Satin Finish for interiors on a an Ikea Tarva pine dresser as well. I am wondering if you need to coat the paint in something else before putting clothes in the dresser? Is there a finish or seal that’s needed? Thanks!
Hi, you don’t really need to seal the paint. Also, for this project we didn’t paint the drawer interiors.
I love this and plan to try this at my house. Did you have to saw the top of the dresser a bit narrower to ensure the sides of the dresser would be completely flush? The picture of Tarva on the Ikea website looks like it has about a 1 cm overhang on top. Thanks!
There is an overhang on the top towards the front, but not on the sides. So they fit together perfectly.
which colour paint is used in this
Thank you for posting your upgrade process. I followed it for the lowboy version of Tarva and it came out great. When I was assembling the dresser, I took a chance and left off the bottom section that incorporates the legs. Instead, I subbed in gold tone furniture legs I purchased online, attaching them directly to the bottom of the dresser. Thank you for the inspiration!
What color is this?